I am often heard to exclaim "How (expletive deleted) much?" when being shown or told about the latest hot new kit on the market, and this time was no exception.
However, the reason for my surprise at the new Hobao Hyper H2 Pro was not how high the price is but how low.
This kit, with a little shopping around, can be delivered to your door for just 135 English pounds!
So it's off to the man cave for a bit of wrench time to establish if this kit is the bargain it appears to be.
Upon opening the box one is greeted by the usual plethora of plastic bags bulging with promise.
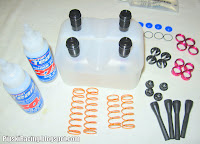
A pleasant surprise is that Hobao have even included a full set of tyres and inserts, not sure how suited they are to UK tracks but the thought is there.
Another highlight is the beautifully machined and engraved chassis that would be quite at home on a car three times the price.
A point of note is the different coloured anodising on the various alloy parts, red for the shocks but orange for the rest, it sounds odd but looks fine built up.
The included manual, whilst not being in the same league as Xray for instance, is ok and contains decent clear diagrams of most stages of the build.
At some points the builder has various options which aren't clear in the manual meaning a little initiative is required, to try and help with this I will point out some of them as we go along.
The manual encourages us to get the dirty jobs out of the way early, first up is the diff.
Most 2wd cars come with a ball diff and offer a gear diff as an option, the Hobao comes with a gear diff as standard.
Gear diffs have their pros and cons, I like them. The unit supplied with this car is a good one and comes with metal internal gears, machined out-drives and decent hex head bolts.
Tip: I filled mine with 5000wt silicone oil.
Use some 'Green Slime' on the o-ring out drives and a smear of grease on the supplied gasket to avoid leaks.
The finished unit, put it aside ready for later, just like on Blue Peter.
Shocks next.
Despite the odd colour these appear to be decent quality. They are big bore units with alloy bodies and hardware. They are sealed at the bottom with double o-rings and at the top with a flexible bladder. Included are two sets of pistons and a set of protective gators, popular on 1/8 rally-x cars.
Despite the odd colour these appear to be decent quality. They are big bore units with alloy bodies and hardware. They are sealed at the bottom with double o-rings and at the top with a flexible bladder. Included are two sets of pistons and a set of protective gators, popular on 1/8 rally-x cars.
The shocks go together nicely, I expect them to be the equal of their contemporaries.
It is worth noting that these dampers are the same size as those fitted to the Losi 22 and some parts, including shock ends, springs, and spring cups are interchangeable.
(Check out the 'no expense spared' shock stand made from an empty milk container.)
Tip: Pre-thread the shock ends with a 3mm screw prior to fitting, this will make them easier to screw on and prevent damage to the shock shafts.
Tip: Use the 4 hole pistons and try 30wt front and 27.5wt rear silicone oil as a starting point.
Tip: The supplied springs are on the firm side. TLR22 springs are a perfect fit, try yellow rears with blue fronts.
So that's the mucky jobs out of the way, on to the chassis.
Here is a shot of the chassis plate, it really is a thing of beauty.
Purposeful looking machining on one side with a cool looking logo etched onto the other (see later pic), the kind of thing one might expect on a car much further up the price ladder.
Mounting the servo is straightforward enough, simply attach to the mount and secure to the chassis, I used a Sanwa WRX that I found rattling around the pitbox .
Hobao thoughtfully include an adjustable turnbuckle for the steering link.
A conventional steering rack is used, rather than the sliding block type fitted to the TLR22, and pivots on some decent feeling bearings.
The rest of the front end will also be familiar to 2wd buggy builders and bolts together nicely as per the manual.
Included are two different kick up plates, one flat and one +/- 5deg, I decided to fit the flat one as a starting point.
Use the appropriate standard servo horn which just clears the bulkhead.
The front arms and hubs look to be made of decent material, a few outings subjected to my dubious driving skills will soon confirm whether or not this is the case!
The rest of the components are of similarly good quality and fit together well. I like the turnbuckles which are of the pierced variety making them simple to adjust without special tools.
Tip: Fit all the turnbuckles the same way round, this will make adjustment simpler. I fit mine with the left hand thread (indicated by a groove) on the left side of the car.
Assemble to the length stated in the manual and adjust to suit when fitted.
The caster blocks are adjustable for height, I assembled mine as per the manual and will adjust as required.
Unusually for a 1/10 buggy the front hinge pins are retained by e-clips, unliked by some but never a problem for me, they do the job simply and effectively.
That takes care of the front end.
That'll do for tonight, time to put my feet up and sip on a cold one.
I will be back in the man cave tomorrow to tackle the rest of the build, including the familiar looking gearbox.
So far this kit has a feeling of quality that far exceeds its price point with nice fitting, well moulded, parts made of quality materials being the order of the day.
Visit again in the next few days to see how it goes.


No comments:
Post a Comment