It's been an exciting week in the Pipski man cave.
I have got my grubby mitts on the latest release from the lads in Northants, the forward motor Cougar KF.
The rise of the forward motor car is not without controversy but that's a debate for another day, its a phenomenon that looks like it's here to stay so, I'm in!
(click on any pic for gallery)
To anyone who has built a Schumacher before, that's probably most of you, the box contents will be a familiar sight.
The first thing I did was fish around for the bag containing the carbon parts.
One of the nice things about Schumacher is that they don't skimp in this area. Where many companies are using CRP (carbon reinforced plastic) Schumacher opt for the real thing.
Given that the current line up of off-road cars all feature alloy chassis it was a (nice) surprise to find a carbon one in this box.
It is very tempting to skip this next stage when building a new car but I always take the time to seal and polish the edges of all the carbon parts.
I run around the edges with a cotton bud dipped in cyno, usually a couple of coats, when dry I polish up with some 1000 grit wet and dry and lastly some t-cut.
The reward for this effort is not just aesthetic but also extra resilience as it helps prevent delamination.
As usual with Schuie all the parts are brilliantly divided and arranged into numbered bags that correspond perfectly with the appropriate build stage in the well written manual. This means that the build is certain to be a smooth one for everyone whether novice or expert.
So with a freshly sealed chassis and parts Bag 'A' at the ready I set to work.
Inside this bag nestled some very nice machined alloy parts, anodised in the new corporate colour, black.
I still rue the passing of the trademark purple but I guess that's progress for you.
These needed to be bolted to the chassis. Past experience with Schumacher cars has taught me that liberal use of thread-lock is recommended here. There is a small bottle supplied but I prefer to use a brand I am familiar with.
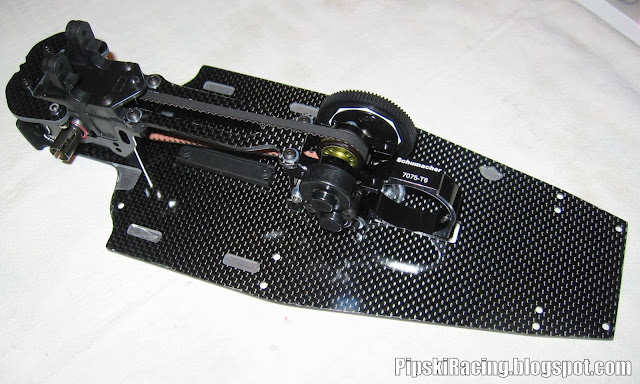
Already looking good.
The familiar clamp type motor mount is used.
Time to assemble the gearbox.
This runs on the quality red seal bearings that can be found throughout.
The slipper assembly comes with pre-roughened pads and some new, cool looking, vented plates.
When fitted it looks like it appears to sit a long way out but a glance underneath will confirm that it lines up nicely with the slot in the chassis.
Anyone who has built an SX will understand when I say the next job is a cow!
The plastic belt guides need to be fitted to the gearbox pulley, they are a very tight fit and require some serious persuasion. Be sure to fit these the correct way round, look closely at the manual, if you come up with an easy way let me know.
Some tough steel gearbox pinions.
These can be changed to alter the internal ratio, the mid option is supplied. Before fitting the cover apply a little black grease, it will keep them quiet and extend their life.
A top quality bando belt is supplied as standard.
As is an adjustable belt tensioner.
Despite Cecil Schumacher being the inventor of the ball diff, gear diffs have started to feature in some recent Schumacher cars, the Mi5, the KR and now the KF.
I guess this is due partly to fashion and partly to the huge forces that these units are being subjected to by high powered brushless motors on modern high grip surfaces.
The unit supplied here is a nice one.
It's compact and, unlike some competitors, features metal gears and cross shafts as standard.
I used a little red grease on the outdrive o-rings to minimise leaks.
In the box there is a small bottle of 12,500 weight oil, this seems heavy but I'll start out with it and see how it goes.
Fill the diff until the oil just covers the cross shafts and leave to settle for a while before sealing up.
It's worth smearing the sealing rings with a little silicon oil to avoid damage and to help the case slip easily into place.
The parts are a really nice fit and I don't anticipate any leakage issues.
The diff can then be dropped in and the transmission uppers screwed into place together with the cover and rear camber plate.
The rear deck is also fitted at this stage.
As you can see things are starting to come together, looking sweet.
So that collection of plastic bags is starting to produce a pretty cool looking car.


No comments:
Post a Comment